Thinking of sprucing up your new home? Want a companion who won’t scratch your furniture? Plants are a great addition to any home and can enhance the wellness of the residents through biophilia! Plant care can also serve as a humbling reminder of the health and vitality that we all crave in our lives and in our spaces, and the intention it takes to maintain true wellness. This blog series will be a guide to help you make decisions about your plants to keep them as healthy and happy as possible!
First considerations: Light Levels & Placing Your Plants
When deciding where to place your new plant in your home or office, it is important to first consider your plant’s light requirements. Light has a direct impact on a plant’s ability to photosynthesize and absorb nutrients, and this is an important factor when considering what plant to introduce to your space. High light can be defined as anywhere that is directly in front of a light source, such as a large south-facing window, or underneath a grow light. In a south-facing, unobscured window your plant will be able to see the sky all day and the sun for part of the day. Indirect light, as the name suggests, is anywhere in a space where the light is diffused. North facing windows or brightly lit areas in your home that are away from a window and direct sunlight can be considered “indirect light.” Think about what light levels your space allows before selecting your indoor plants, and consult an indoor plant catalog to see what plant varieties will thrive in your home.
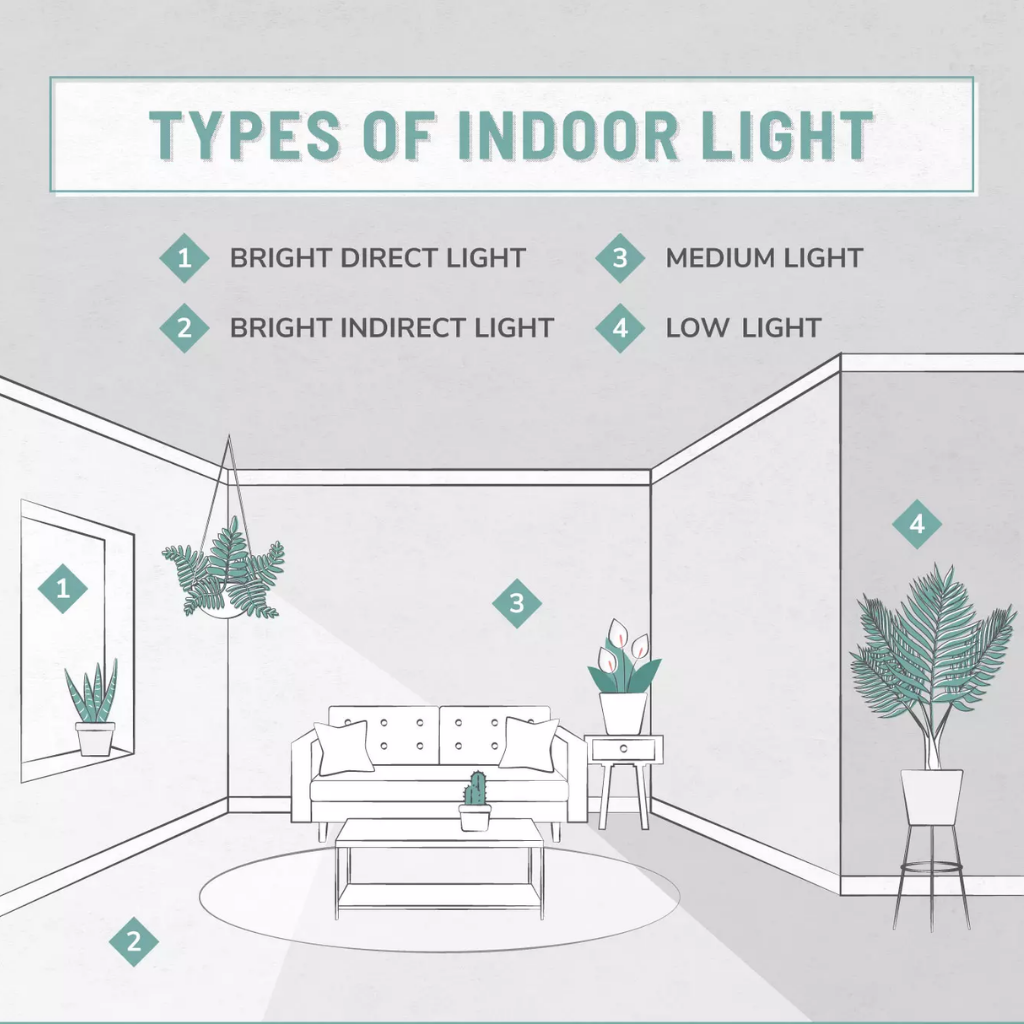
Different types of indoor plants have different light requirements. See above indoor light diagram from Apartment Guide which illustrates the types of indoor light.
Consideration of cold or hot drafts is also important, as well as drastic temperature changes that can cause shock to the plant. Try to avoid placing your plant directly underneath any air vents in your space. This will help your plant to avoid major fluctuations in humidity and heat. Be wary of any particularly hot areas as well. If a plant is placed next to a radiator or heater, and especially if it sits next to a heater and a large window with lots of light, it will take in water rapidly. When plants are situated in extremely hot areas, they can be difficult to maintain as it becomes very easy to both over and under water. You may notice that even if you generously water a plant in such a location, it may be desert dry by the next week. This might make you inclined to water it even heavier, but that may lead to overwatering the plant, even temporarily. Drastic jumps in overly wet and overly dry soil are not healthy for a plant. You never want a plant to go bone dry as this can actually damage the roots and inhibit its ability to take in water. In this case, your efforts to water the plant will be in vain, and the water will sit in the soil eventually causing the rest of the plant to rot out.
Watering & Soil
Well-draining soil mixes are imperative for the long-term health and happiness of your plant. A mixture of organic potting soil, perlite, and orchid bark will provide an excellent blend of drainage and moisture retention. Most tropical houseplants will do very well in a combination of these substrates. Certain plants like cacti and succulents require special, fast draining soil that you can find at your local garden center. These types of plants also enjoy added perlite to ensure excellent drainage. Orchids are another type of plant that require special potting medium – sphagnum moss, clay pebbles or orchid bark – as regular potting soil will suffocate the roots and kill your average orchid.
Mixing several substrates to create a solid, well-draining mixture will help to avoid the risk of overwatering your plants. Additionally, a container with drainage holes allows for excess water to drip from the bottom of the container and can help new plant owners avoid accumulating stagnant water in their soil. Well-draining soil planted in a well-draining pot also allows for the movement of oxygen throughout the root system. Oxygen is just as necessary as water and light when it comes to plant care. Air pockets allow improved drainage, and absorption through the roots.

Over and underwatering often have some overlap in visible symptoms, but also have distinguishing features to help identify the problem. Contextual elements can help determine the core issue. While both over and under watered plants can appear limp, wilted, or lackluster, the main difference in appearance can be boiled down to the texture, mush vs. crisp. If your plant’s leaves look mushy, are limp, and have lost their waxy shine, you may be suffering from overwatering. Overwatered plants can also develop yellow and/or brown spots, and in certain instances the entire leaf may turn yellow. In this case, use your finger or a chopstick to determine how saturated your soil is. Plants can enjoy a saturated root mass, but do not want to sit in stagnant water. Conversely, if your plant is underwatered, you may expect to find crispy brown or yellow leaves. The soil might be dry and overly compacted. Often, your plant can bounce back from being underwatered and just needs a good drink.
It’s always a good idea to check your soil before watering. A soil probe can be useful as it will reach deeper into the soil and help you determine if there is still enough moisture by providing a soil sample from the bottom of your planter. Soil tends to be dryer on the surface and especially with larger pots it can be hard to probe far enough using your hand, but using your hand is always an option as well. Water your plants in well and let them dry down to the point when you cannot squeeze any water out of the soil but you can still feel the moisture before watering again (rather than having it have a completely dry sandy texture).
Pruning & Cleaning
Pruning is important in maintaining your plants’ aesthetic. Cutting down long, tall, or leggy growth encourages the plant to push out new growth and stay fuller with more bushy and lush foliage. With plants such as Aglaonemas, which tend to develop long “leggy” stems, you can cut the plant off close to the base and it will grow a fresh stem from one of its nodes. This can be performed with many plants to help keep the growth consistent and manage the appearance of the plant. Pulling yellowing leaves and dead leaves off not only improves the visual appeal of a plant but also aids in minimizing pests inhabiting the plant as they are often attracted to decaying matter. It also helps the plant optimize where it sends its energy and promotes new growth. Wiping down foliage to remove buildup of dust also improves plant healthy, increasing its ability to absorb light and photosynthesize, and remove decaying matter that might encourage unwanted pests.

Fertilizing
Fertilizing can help to promote new growth as well as give the plant some extra support in taking up the nutrients it needs. It is best to fertilize your plants regularly through the growing season (usually March through October), but don’t be afraid to fertilize if the plant is continuing to push out new growth. During the winter months, plant care routines change as tropical indoor plants can go dormant and will drink less water, so less plant food is required. Soil should not be completely dry or soaking wet when you fertilize. Damp, moderately moist soil is best. The majority of fertilizers consist of some combination of nitrogen, phosphorus, and potassium. Nitrogen feeds leaves, phosphorus feeds the roots and blooms, and potassium strengthens roots and stems.
A word from the wise: never fertilize your plant if you are combatting any kind of pest infestation. The new growth in the plant will be extra nutrient rich which will only be exponentially more irresistible to pests and will make managing them more difficult.
Common Pests
Speaking of pests, finding pests on your houseplants is a rite of passage in the interior horticulture industry. Not only can they damage the leaves of your plant, but pests can also prohibit new growth from flourishing, and when left unchecked can kill the plant entirely. Fungus gnats, mealy bugs, and mites are some of the most common pests.
1. Fungus gnats: Fungus gnats live in soil. They eat plant roots and are attracted to light, which often results in them flying around a laptop or phone screen. Although they are not the same, at first glance fungus gnats somewhat resemble fruit flies. Because they fly, fungus gnats can easily spread to other plants nearby, so it is important to treat not just the affected plant but all of those around it as well.
2. Mealybugs: If you see small fuzzy round spots on the leaves or stem of your plant, it is most likely mealy bugs. Mealy most often live under plant leaves or on the stems, and in some cases live in the soil depending on the type. They form cottony nests where they are feeding and will consume the sap of a plant. They secrete a sticky honeydew that can encourage growth of sooty black mold on plants. Mealybugs thrive in warmer temperatures and prefer tropical plants with softer stems and thicker, fleshier foliage that they prefer to feed on.
3. Spidermites: Mites appear as tiny white dots on leaves and cause damage directly the leaves as they consume the sap. Signs of mites include discoloration or fading of leaf color, particularly on the undersides of the leaves. You may even see holes in the leaves. Mite populations can spread quickly and they are enhanced by dry and hot conditions.
The first step in pest management is prevention. Regular cleaning of your plants leaves with a foliage spray will help prevent dust build up and can eliminate any hidden larvae before they hatch. Neem oil is an excellent option for cleaning foliage as well as treating and preventing infestation. If you find yourself with pests on a plant, isolate that plant immediately. Any active pest infestation can be helped by using a small amount of rubbing alcohol and a cotton swab to remove any visible bugs. Next, spray your plant thoroughly with neem oil (or a similar insecticidal spray for indoor use from your garden center) and wipe the leaves clean and dry. This will remove any insects and help hinder larvae growth. Spray and wipe your plant once per week until your infestation has subsided.
Repotting
Repotting your plant is an important part of cultivation to provide more room for your plant to grow bigger. Over time, the soil can become depleted of nutrients and refreshing the soil can help your plant retain moisture and absorb nutrients. To remove your plant from its current pot, you’ll need to loosen the soil. If your plant is in a plastic grow pot, you can gently squeeze around the container to release the root ball. If your plant is in a ceramic or non-flexible container, use a butter knife to gently separate the soil from the side of the container’s interior. Once you have removed your plant from the pot, loosen the root ball by gently massaging and shaking the soil mass. In your new, larger planter, add a thick layer of fresh potting medium before carefully resting your plant in the container. When adding dirt, be sure to press firmly and shake the pot a bit as you go, so that the soil can settle in the nooks and crannies of the roots. It is sometimes helpful to hold your plant slightly suspended in the new container as you fill in the soil around it. Lastly, you’ll want to thoroughly water your newly potted plant. When you first water, you may notice the soil settles and you are left some large gaps in potting soil. Be sure to fill this in so that the plant’s roots are fully covered.
With all of these factors in mind, you can transform your plant care routine, creating the right habits that will cause your houseplants to thrive! Looking to add more plants to your plant collection, or have other plant care related questions? Reach out to our TransPLANTed team for expert advice.
Happy growing!

Leave A Comment